JUST BECAUSE IT'S A KIEV DOESN'T MEAN IT HAS TO ACT LIKE ONE

(You may Right-Click on any image to save a larger version of it to your hard drive.)
JUST BECAUSE IT'S A KIEV DOESN'T MEAN IT HAS TO ACT LIKE ONE
(You may Right-Click on any image to save a larger version of it to your hard drive.)
I've put this book/site together because I like the Kiev 60 right out of the box but simply love it when it works the way it should. After using a K60 for years, I've had to do most of the calibrations and fine tuning myself. In this book I'll be covering the following areas:
1.WHAT YOU ARE GOING TO NEED (Sometimes you just need the right tools)
2.GETTING INSIDE YOUR KIEV 60 (Goody, goody! We get to take stuff apart)
3.FOCUS SCREEN CALIBRATION (It really helps to have in focus images)
4.FILM SPACING (A real big problem for K60's)
5.SHUTTER SPEED ADJUSTMENT (Timing is everything)
6.PUTTING IT ALL BACK TOGETHER (This is moment you've been waiting for)
7.TTL METER ADJUSTMENT (Another weak link in K60's)
8.FLOCKING (Reducing stray light and reflections)
I hope this book covers the problem areas in your Kiev. I think you'll find when your Kiev works the way it should, it is a wonderful camera to use at a fraction of the price of many other 6X6 slr's. Enjoy!!!
First off
you're going to need some tools. Here's what I recommend:
1. Micro Screwdriver Set (You can find these
almost anywhere these days)
2. Pair of Pliers (I prefer to use a
multi-tool)
3. Hand Towel (You'll wish you had it
if you drop a screw)
4. 8X Loupe (This is for focus screen
adjustment)
5. Sturdy Tripod (It makes calibrating the focus
screen easier)
6. A Distant Object to Focus On (The farther the
better)
7. Two Film Spools (This is for frame spacing adjustment)
8. Backing Paper From An Old Roll (This is also for
frame spacing adjustment)
9. Trim Adhesive (The brush on kind, this is for attaching the
leatherette)
10. Small Modeling Brush (This is also for attaching the
leatherette)
11. Flash with a PC Connector (This is to check flash
sync)
12. Shutter Speed Tester (If you don't have one, I highly
recommend getting one)
13. Accurate Light Meter (This is vital for meter
calibration)
14. 18% Gray Card (This isn't a necessity but it
helps)
15. Clamp Light w/ 75w Bulb (This is also for meter
calibration)
16. Medium Modeling Brush ( This is for flocking the inside of
your K60)
17. Krylon Ultra Flat Black Paint (This will be used to
flock your K60)
Now that you have these things, you are ready to get to work. On to step two
2.GETTING INSIDE YOUR KIEV 60
(SOMETIMES TAKING THINGS APART IS THE MOST FUN)
First off you are going to need to get inside your Kiev. Lay out the hand towel and place your Kiev on it. Now you're ready to work!
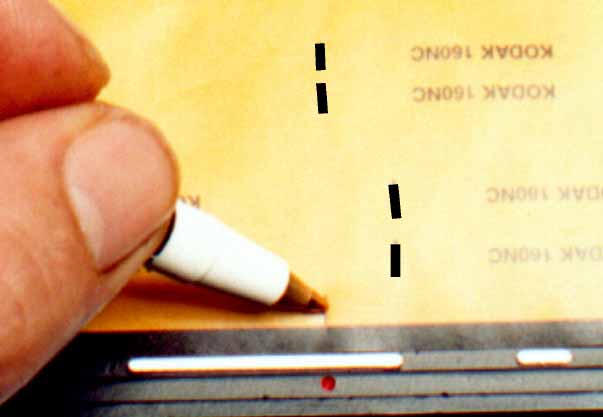
You need to take off the shutter speed dial. I suggest setting the shutter speed to "B" before you start. Then you will need to take off the leatherette on the top of the dial. You shutter speed dial should now look like this:

Now remove the three screws that hold down the shutter speed dial. Underneath the shutter speed dial is the guide the dial sits on. It will look like the following:
Here you will find three more screws , these will need to be removed also. Under the dial guide there is yet another small guide. If it doesn't come out when you remove the first guide, leave it in (this is what the dial is screwed into). Now on to the advance lever.
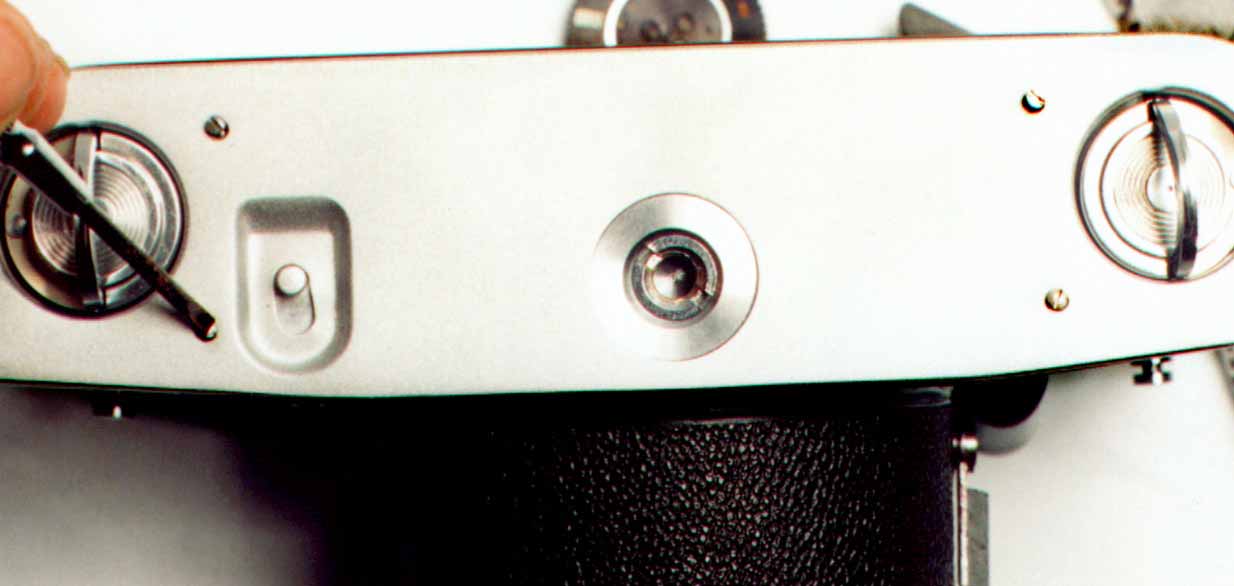
First you need to take off the ISO selector cap. It's on screwed on and will come off if you turn it counter-clockwise. You may need to use the pliers to do this. There will be some washers, the ISO dial , a disk with film speeds and a spring.Be sure to keep these items in order after you take them off. When you've done that your Kiev will look like this:

You will see a threaded base with what looks like two screws and a wax seal (underneath the seal is the third screw). Scrape off the seal and remove the three screws. You will also find some washers here to. Now you're down to the advance lever and it will look like this:

The next step is to remove the advance lever screw. For this you'll definitely need that pair of pliers. Turn the screw counter-clockwise and lift off the advance lever. Under the advance lever is yet even more washers and the lever guide. Take these off too.Now it's time to take of the top cover.
To remove the top cover you need to remove the retaining screws. You'll find them in the following places:

TOP BACK 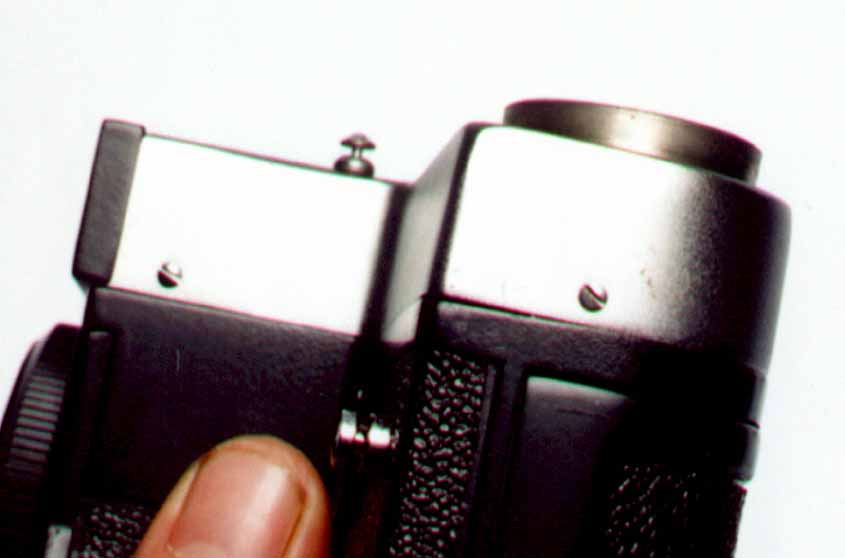
TOP LEFT

TOP RIGHT
After you remove the screws it time to open up your Kiev. With the back of the Kiev facing you, push up on the top cover as shown below:
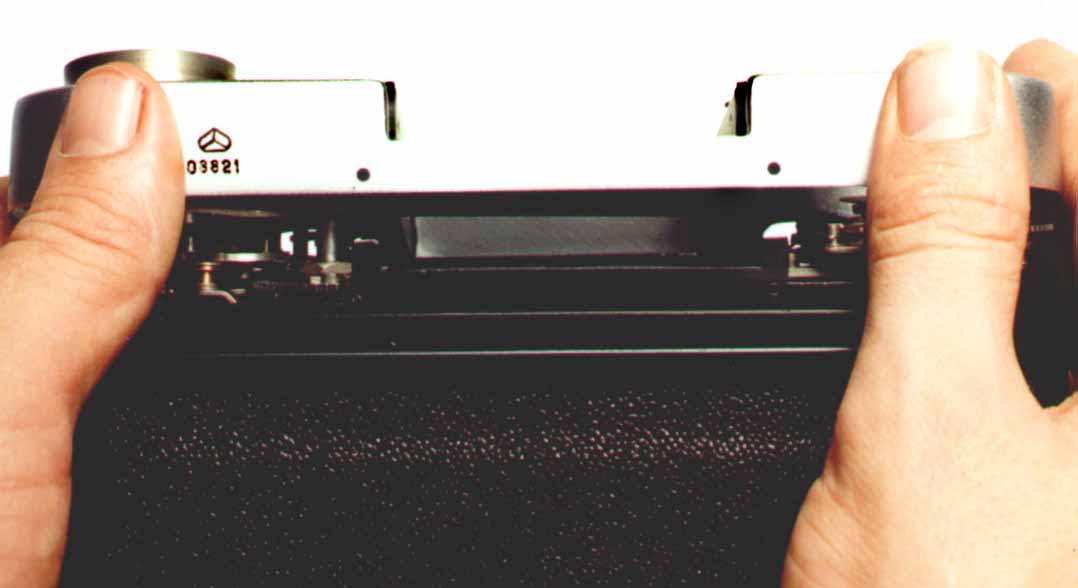
Now lets take a look inside!!! 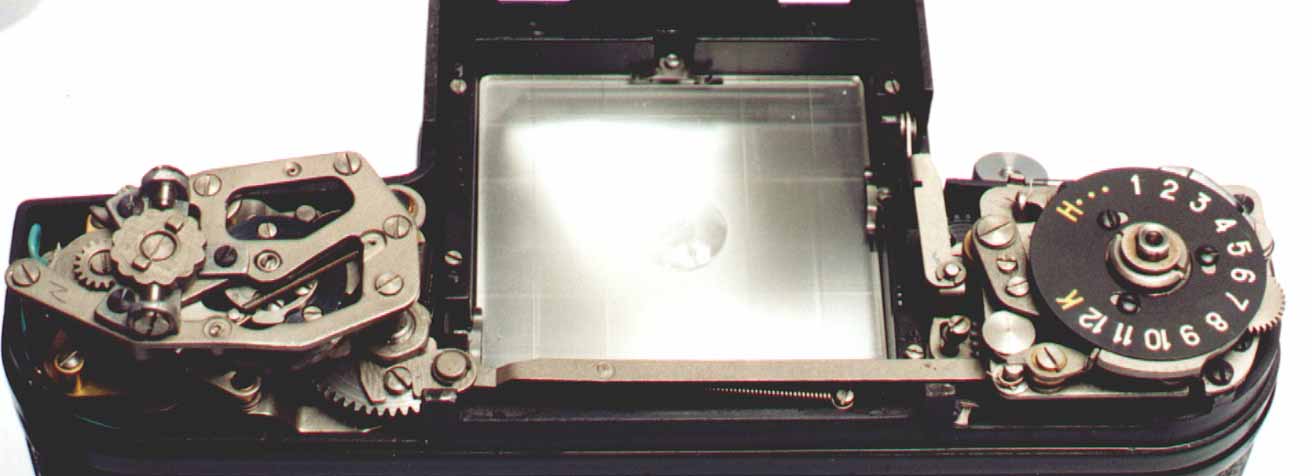
Lets move on to step 3
3.FOCUS
SCREEN CALIBRATION
(IT REALLY HELPS WHEN
YOU CAN SEE WHAT YOU ARE DOING)
Have you ever wondered why some of your negatives (or slides) come back from the photo lab out of focus when you use your Kiev? When I got my first Kiev I did. At first I thought it was my eyes but all my 35mm shots were fine. Being familiar with large format photography and the use of ground glass as a method of focusing a camera, I made a makeshift ground glass insert for my Kiev. I focused the Kiev opened the back and fired the shutter. Man was I surprised how off it was. Having worked on older 35mm slr's, I had a good idea of how to get inside my then new Kiev. Well, now that I've droned on long enough, on to the real reason your here.
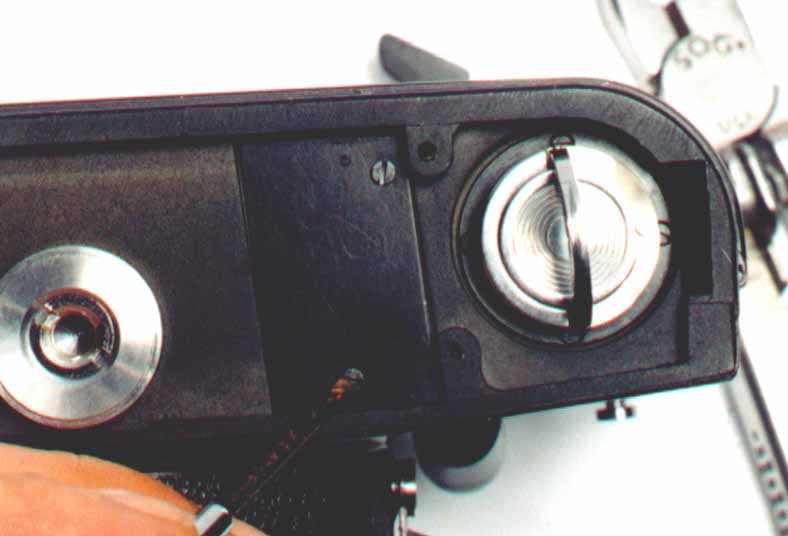
Place your Kiev on a tripod and set the lens to the infinity mark. Now find a reference point it towards your reference point. Now that you've removed the top cover of your Kiev and stared at it's workings lets look at the focus screen:
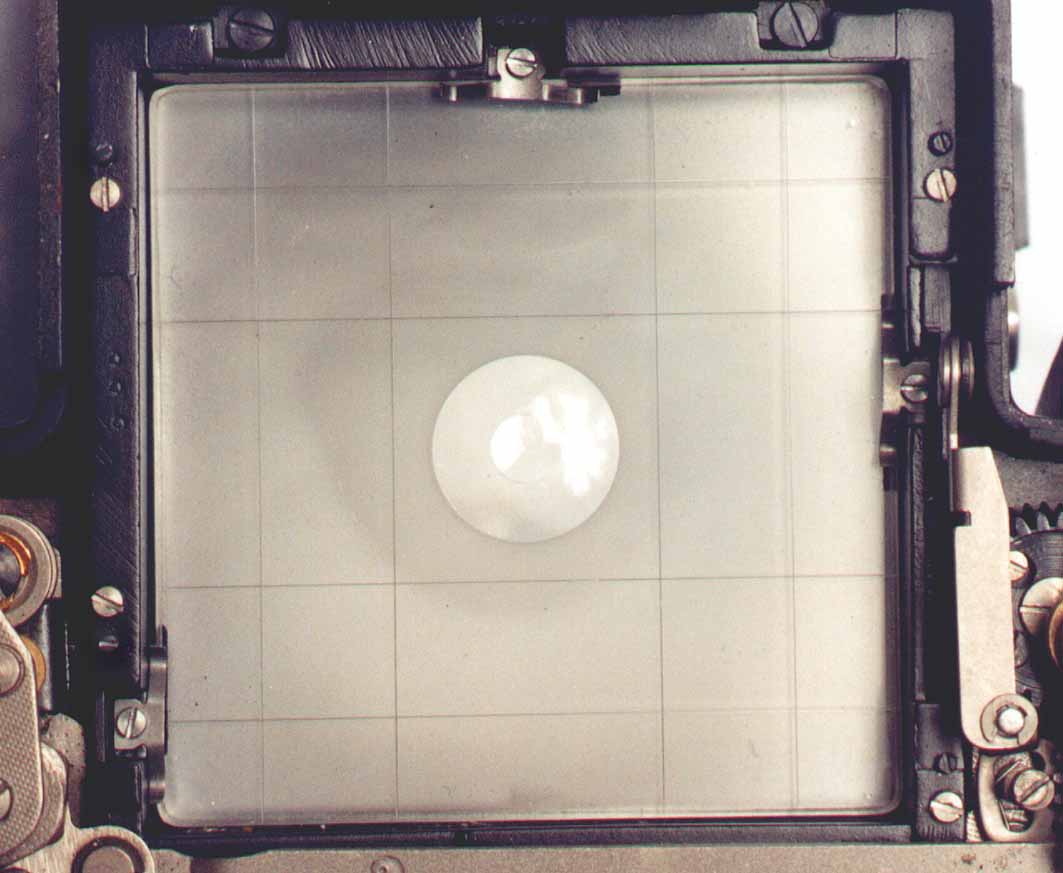
You'll see all kinds of screws and retaining springs, don't be intimidated. This is the easiest fix for the Kiev but is also the most time consuming. First you will need to put on the 80mm lens that came with your Kiev, second you will need to reattach the advance lever, but don't bother with reattaching the ISO dial. Then you will need to advance the camera (if it isn't already). With the lens at the infinity mark lets take a look at what your focus screen shows:
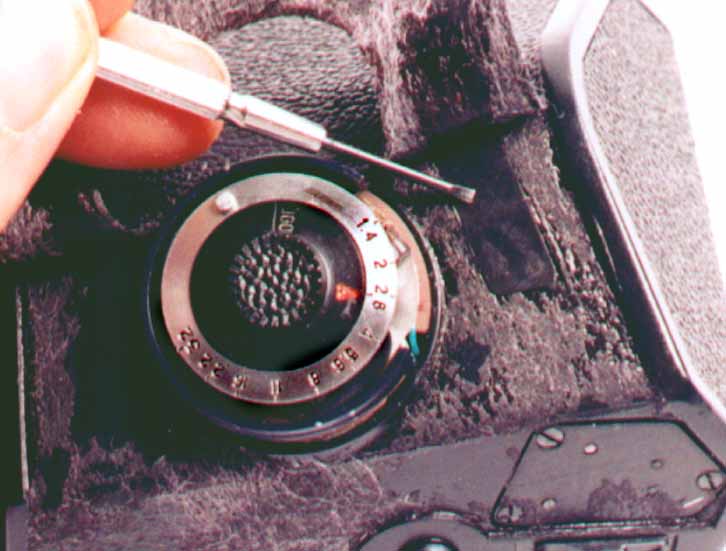
Check the focus screen with the loupe to see if you are in focus. If it's in focus all over then you're doing good and it's on to the next step for you. If not, then hang around and I'll show you how to fix it. There are adjustment screws (black) and locking screws (silver) and here's what they look like:

LOCKING SCREWS 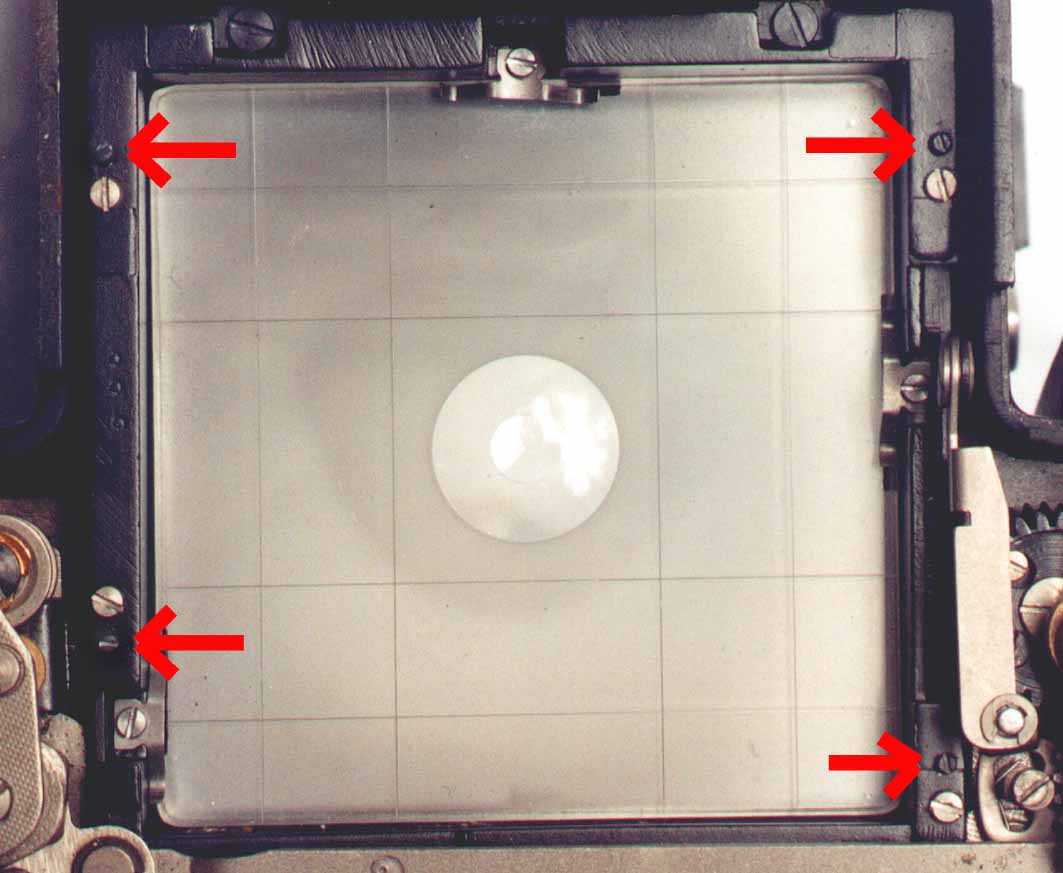
ADJUSTING SCREWS
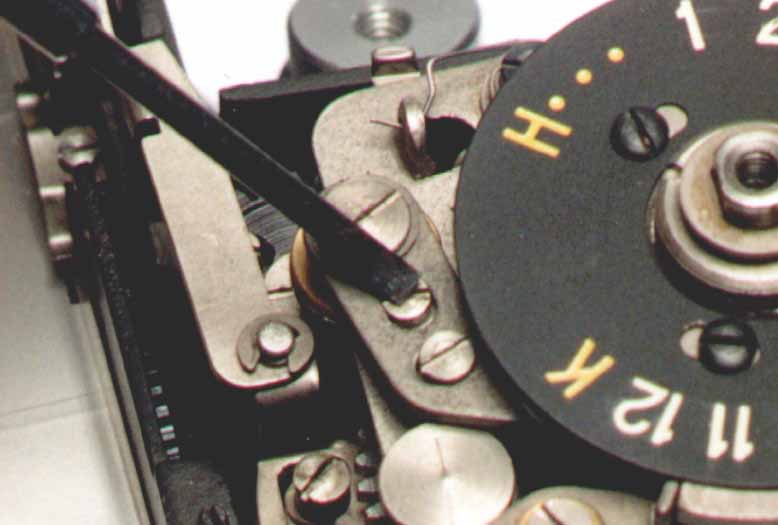
Loosen the locking screws. Starting with the top left adjusting screw,
turn the screw (try one way then try other) until the upper left corner of the
focus screen is in focus. Repeat these steps with the three other screws. Check
the focus screen with the loupe and repeat the steps if needed.
Frame spacing is a big problem on Kiev's. Some of us get that famous extra shot/frame kiss on our rolls. Now I've read about all kinds of fixes like how you need to find film spools of this or that thickness. I'll be the first to admit it, I'm lazy. I don't want to mess with measuring all my film spools to see if they are the thickness some suggest or some other mundane task to get proper frame spacing. I just want to take pictures. That's why I'm going to show you how to adjust the Kiev 60's frame spacing the way it should have been done at the factory.
Let's take a look at the area on the Kiev you will be working with:
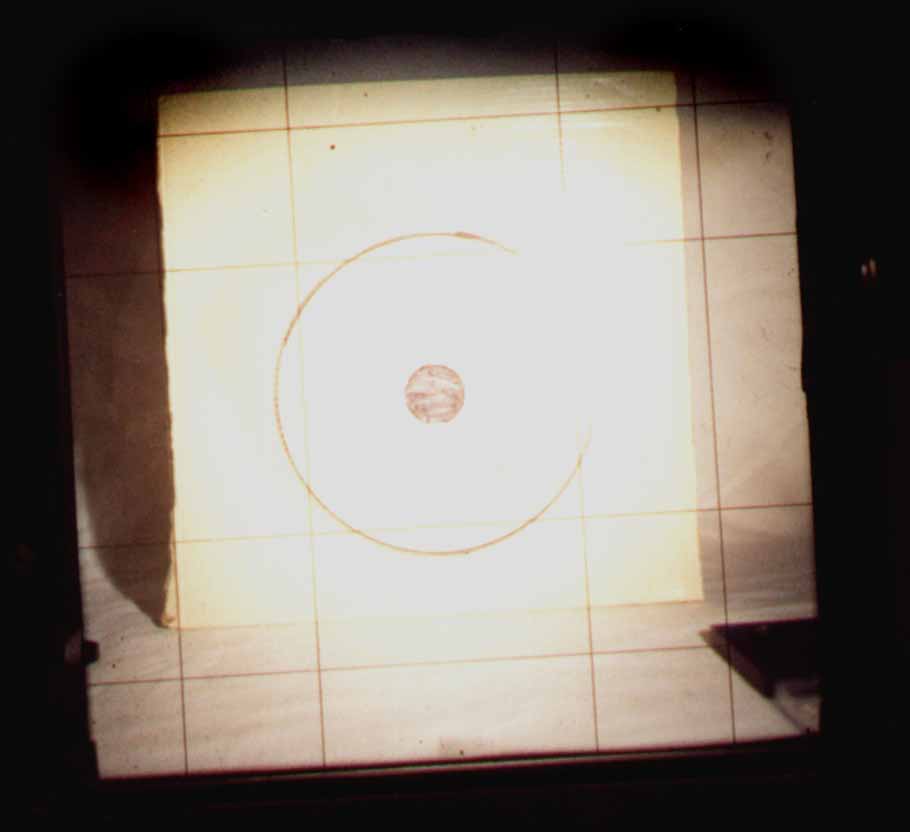
Take your backing paper and wrap it last frame number first around one of your empty spools. Now open the back of the Kiev and load the spool with the backing paper the way you would a normal roll of film. :
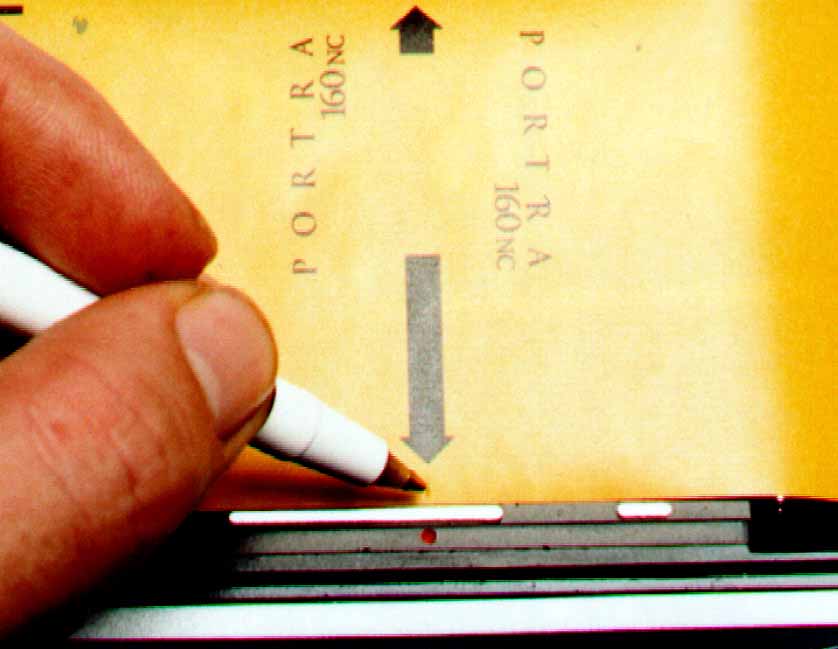
START MARK
As you can see, the "1" in the middle of the backing paper isn't in the center of the shutter opening. This shows that the Kiev's frames will overlap (that's why you're here).
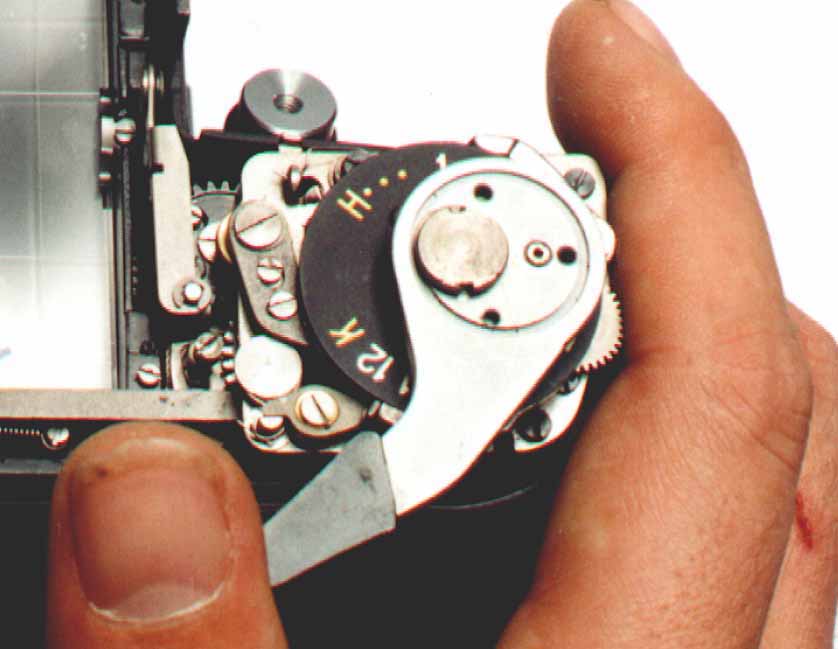
Now you need to remove both spools and respool your first spool again. After that, reload the spool again and leave the back of the camera open. The is the first screw you will be working with is the locking screw (I've taken off the advance lever to make it easy to see the screws but leave yours on):

LOCKING SCREW
Turn the locking screw 180 degrees counter-clockwise. The next screw you will be working with is the frame spacing adjustment screw and it looks like this:
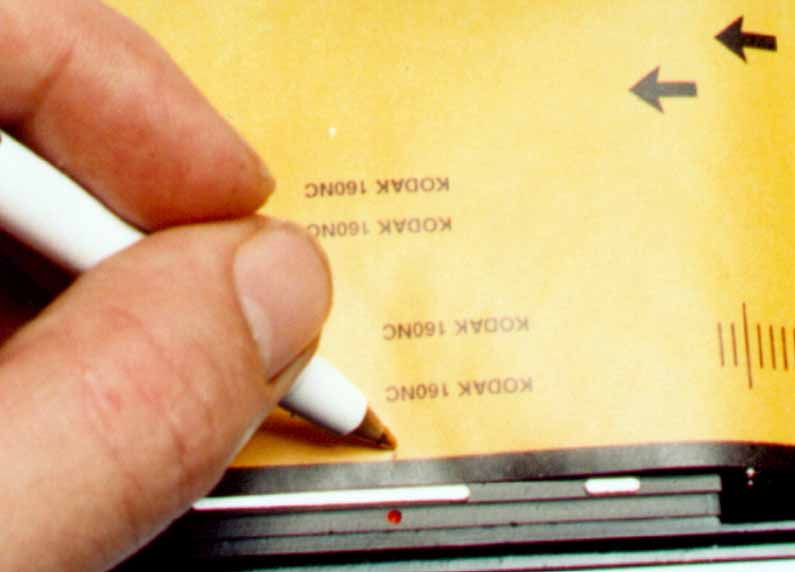
The adjustment screw sits in a little oval guide. Turning the screw to the left moves the screw to the front and so on. Move this screw all the way to the front and tighten the locking screw. With the back still open advance the camera four times again. Now make a " f " on the paper like so :
SECOND REFERENCE MARK
If your K60 advanced the paper with the "1" to the middle of the shutter opening (or even as far as the red dot) then you're done. I personally suggest having the "1" in the middle of the paper line up with the red dot because if the "1" is lined up with the red dot you'll get close to 1/4 inch spacing between frames!!!
If your K60 didn't advance the paper far enough to place the "1" in the middle of the shutter opening or farther and advanced it shorter than your first reference mark then move the adjustment screw all the way to the back, respool and load the paper and advance the camera four times again.This time mark it with a "b". Check to see what direction the adjustment screw needs to be moved to increase the film advance. By moving the adjustment screw in small increments you can fine tune the film advance.
*NOTE* If nomatter what adjustments you make you can't get the camera to advance the paper far enough to get the "1" in the middle of the shutter opening then I'm sorry to tell you that there are machining problems in your Kiev and may want to replace it.
Now you are done with the adjustments needed on the top side of the K60 take off the advance lever and put your Kiev back together (don't worry about the leatherette, I'll cover that in section 6).Lets go to shutter speed calibration next.
As if having an inaccurate meter wasn't bad enough, sometimes I've found bodies that the shutter speeds were off by as much as a stop. (Then again, I'm still using a '79 Salut-S that's consistently 1/2 stop slow as my studio camera, I guess the springs are shot but I can't bear to part with it.) I shoot slide film for almost everything and having accurate shutter speeds are a must. Well, lets get started.
Looking at the bottom of the camera there are four screws that need to come out. Lets see where they are:
After removing the screws you need to remove the bottom plate. Lets take a look at what's inside:
You'll find a small plate with two screws. You need to remove the screws and remove the plate. Now it should look like this:

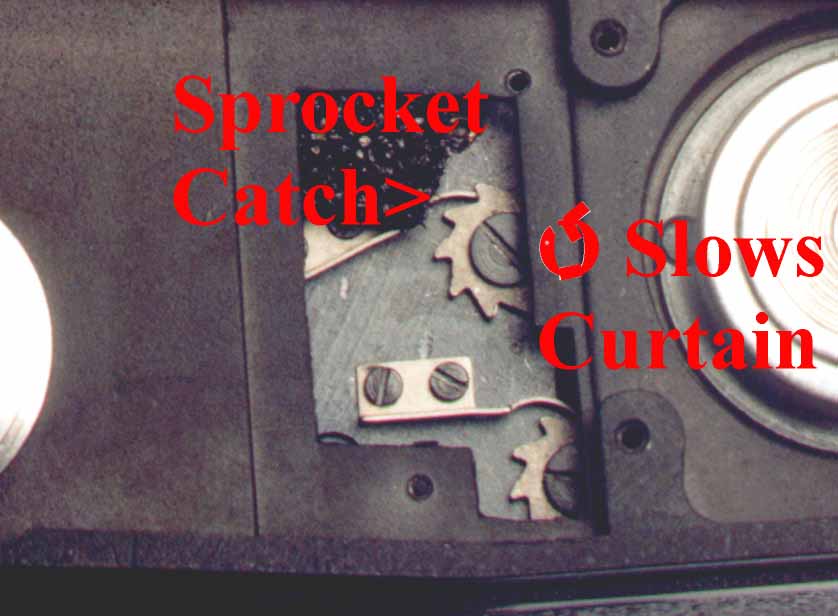
Adjuster 1 is for the first curtain and adjuster 2 is for the second curtain. The first curtain determines how fast you shutter opens and the second curtain determines how fast your shutter closes.
Now follow the directions for the shutter speed tester on how to check your shutter speeds. Start with the 1/2 second setting and time the shutter speed three times. The times should be close to each other. Add the times together and divide the total by 3, this will give you the average shutter speed for the 1/2 second setting. Now do the same for the rest of the shutter speeds. Generally the higher settings (1/500th, 1/1000th) will be further off than the slow speeds, sometimes as much as a stop but this is rare. After getting an average shutter speed for all the settings, compare them to the speeds on the dial. If you are within 1/2 stop at all settings ( 1/3 to 1/4 stop for slide users) then I suggest leaving the speeds be. The shutters in almost all manual cameras are rarely dead on.
Now lets check the flash sync. Attach the flash bracket, connect your flash, advance the camera and set the shutter speed dial to 1/30th. With the lens off and the back open point the camera towards a white surface (a white wall works great). Looking at the back of the camera, look at the right side of the shutter opening and fire the shutter. If the shutter's second curtain can be seen in the shutter opening then the second curtain is closing to quickly. Insert a flat head screwdriver in the slot for adjuster 2, take another screwdriver and push the sprocket catch away from the adjuster sprocket. To slow the second curtain to adjust like shown below:
*Note: In the case of increasing the curtain speed, don't turn the adjuster if the adjuster gives a lot of resistance. Doing so can damage the springs and ruin the shutter! Also, sometimes the contacts are misaligned when they are manufactured. This will cause the second curtain to not sync properly with the flash and intrude on the shutter opening. This is a problem that requires a repair tech and is not covered in this book.
Keep checking the second curtain till you no longer see it in the shutter opening during the exposure. Now check the first curtain using the method described above and adjust as needed. The adjustments for the first curtain are the same as the second curtain.
Now disconnect the flash and check the 1/30th setting again with the tester. By adjusting the second curtain to open faster or slower you can increase or lengthen your shutter speeds as needed. Once you have calibrated the 1/30th setting, reconnect the flash and recheck the curtain position. The second curtain should not intrude on the the shutter opening. If it does, then slow down the second curtain in increments of one sprocket tooth till it can no longer be seen in the shutter opening. Recheck the shutter speed to see what the 1/30th setting actually is. As long as you are fairly close
You then need to disconnect the flash and check the 1/60th speed setting with the tester. By checking shutter speeds and adjusting the first curtain you can fine tune the higher shutter speeds. Again, the faster the shutter speeds the less accurate it will be. Here is a list of recommended tolerances for shutter speeds.
1/2 to 1/15th - within 1/4 to 1/2 a stop
1/30th and
1/60th - within 1/4th stop either way
1/125th to 1/1000th - within
1/4 to 1/2 stop
Once you are finished with adjusting the shutter put the bottom back on. You will need to hold the camera back release button in place with a screwdriver while you put the bottom back on.
Lets put your calibrated Kiev back together.
Now that we have finished all the internal
adjustments it's time to put your Kiev back together. Remove the advance lever
and follow the disassembly instructions only backwards. For those of you that
can read or talk backwards it will be a breeze. "But what about the leatherette"
your thinking. Well you'll need to take some trim adhesive dip a modeling
paint brush in it and lightly brush the underside of the leatherette. Be sure to
follow the instructions for the adhesive because most adhesives require that you
wait awhile before you actually glue anything back together. After the adhesive
has had time to get sticky, put the leatherette back into place. Your Kiev will
most likely need to set over night for the adhesive to "cure". After that's over
we can move onto the next step, calibrating your meter.
7.TTL METER
ADJUSTMENT
(NOW I KNOW IT'S NOT THAT DARK
IN HERE)
Most of us carry around a handheld meter when we use our Kiev's. It's not because we're "zonies" (people that zone meter EVERYTHING) it's because we have to. When we do calibrate our meter using the "sunny 16 at 100ISO and loosen dial" method we find that our meters are nonlinear. We end up getting under or over exposures depending on the lighting. So now we are back to square one and still need a handheld meter. I've heard that nobody can make a nonlinear meter meter properly. I think it's more like nobody wants to take the time and believe me it takes a lot of time. This method will calibrate the meter for readings of about 1/1000th @ f/11 down to about 1/4th @ f/2.8 at 100ISO and get the meter within about 1/2 stop over the entire range. This range of readings is one stop short of the entire range of the meter dial. I guess we should get started.
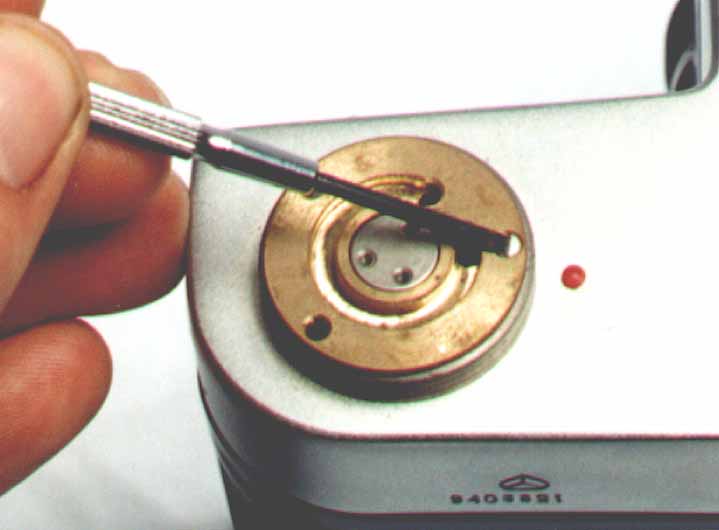
You will need to have the meter on the camera. Put the clamp light on a table or tripod (If you have a second one) and put the K60 on a tripod. Turn on the light and meter it using your reference (I suggest an accurate 35mm slr with a 50mm lens ) meter. Move closer or farther away until the meter reads 1/1000th @ f/11 at 100ISO. Place the tripod mounted K60 at the same distance from the light and be sure the camera and light are level with each other. Set the lens on your K60 to infinity, turn the meter dial clockwise till it stops, loosen the set screws in the dial like shown below and remove the dial:

METER DIAL SET SCREWS
METER ADJUSTER COVER
There is a small rectangular piece of metal like shown above, this is the adjuster cover. Remove the adjuster cover and lets take a look inside:
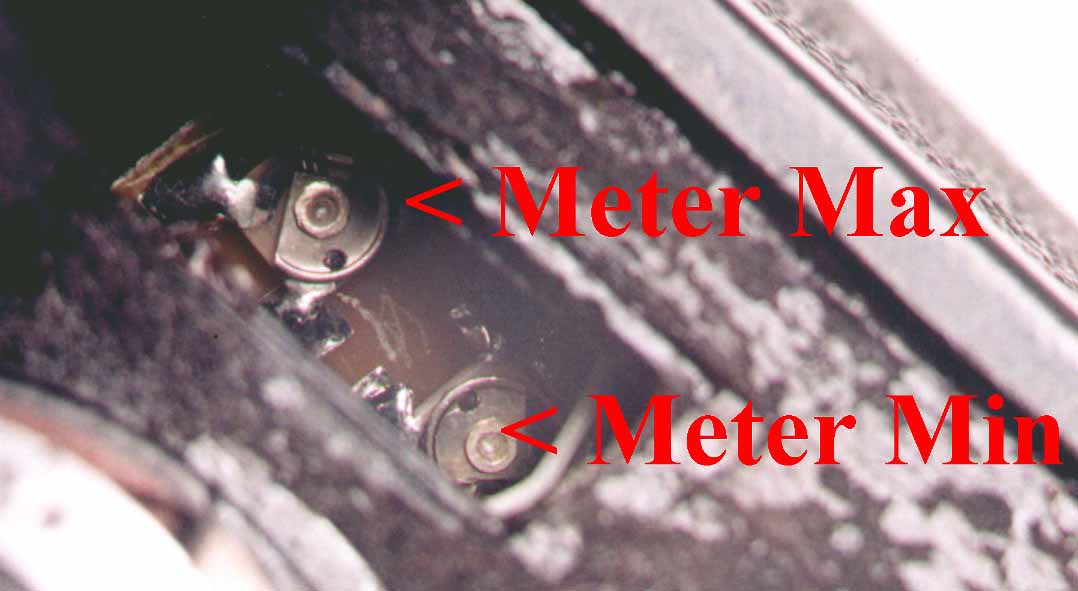
METER ADJUSTERS
Inside you'll see two dials, the one closer to the top of the meter adjusts the meter's maximum light metering and the lower dial adjust the minimum light metering. Now reattach the meter dial making sure that it's set to 1/1000th @ f/11 at 100ISO. Turn the meter on and adjust the meter max adjuster till the exposure indicator in the meter gives you a proper exposure reading.
Now using your reference meter move away from the light source till it reads 1/4th @ f/2.8 at 100ISO. Move the K60 to the same distance and set the K60's meter to the same setting. Looking through the finder turn the meter on and turn the low end adjusting dial till the meter gives a proper exposure. If you are within 1/2 stop or less then don't bother to adjust the meter.
As far as the lower readings, the meters I've worked on fall off rapidly after 1/4 @ f/2.8. Some not as bad as others but enough to be unreliable. The upper and lower limits are limited by the adjuster dials and the accuracy of the CDS cells and circuitry. Having the meter copied with but better parts would probably produce better results but that's beyond my capabilities (or wallet if I had somebody else do it). I feel that the range of accurate readings that this method gives is good enough for most uses.
*Note: Your results may vary from
mine. You meter may only be within 1/2 stop down to 1/8th @ f/2.8, or it may be
within a 1/2 stop at even lower readings. This is due a the lack of quality
control and metering range as far as the meters electronics are
concerned.
Internal reflections are a big issue for K60's. You would think that the factory could have used something other than GLOSS black paint in the mirror box. I guess flat black paint is rare there or nobody really cared about it.
In this section I'll describe the flocking method I use in my own Kievs. Ideally, optical flocking paint would used but for some it's near impossible to find. I'll give you a low cost but effective alternative to optical flocking paint. Here we go.
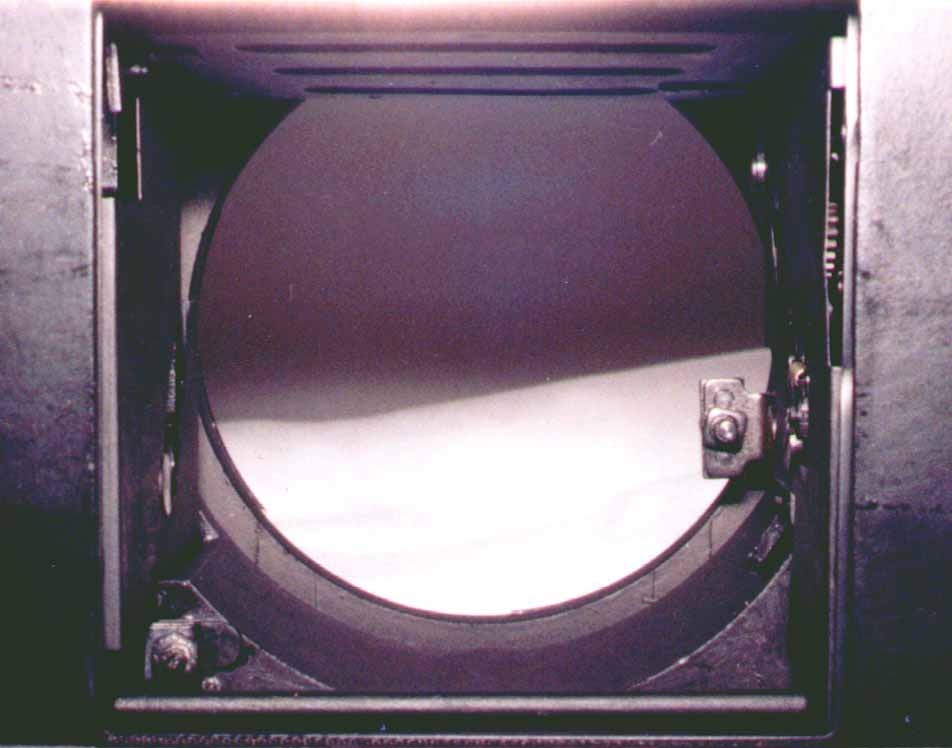
First you will need to remove the lens from the camera and attach the cable release. Advance the camera, set the shutter speed to "B" and open up the back of the camera. Press the shutter release and lock it so to keep the shutter open. Looking through the shutter opening you will see three panels covering the bottom and sides of the inside of the camera and the backside of the mirror mount like shown below:
Spray some paint into a cup. Paint the half of the panels, the mirror mount closest to the shutter opening and anything else that has the stock black paint. Be sure to not paint the pivot points of hinges or else those parts won't move freely after the paint dries. After you have done that, unlock the cable release and turn the camera around so the lens mount faces you. Paint the rest of the areas inside your K60, again making sure to not paint the pivot points.
After you have painted these areas let the body sit overnight in a warm dry place to let the paint cure. The next day go back and touch up where needed.
You now have a flocked and calibrated K60. Except for
replacing a part here and there, you've just done the same thing (and more in
regards to the meter) that some places (I won't mention names) charge $100 or
more for. Even better is the fact that unless your K60 breaks you now know how
to recalibrate it as the camera ages.
Feel Free To Email Me At:
kiev60@netzero.net