
|
|
Skip to Meter Calibration section
An interesting note is that the Kiev 88 prisms will fit on Hasselblad cameras and provide a very cheap alternative. And indeed, it seems that quite a few Hasselblad users have gone with the much cheaper Ukrainian prisms over genuine Hasselblad prisms. I'd even hazard a guess that many of them are satisfied. But, if you're one of those "discriminating" types who is easily distracted and can't seem to focus on the image on the ground glass, you might not want a Kiev prism, as they do pick up some internal reflections. Many people, myself included, don't find this to be a problem, though. Hassy prism? No, thanks. I'd rather save the bucks and buy more goodies for my Kiev! (^_^)
When I first got the Spot-TTL prism, I was a bit confused. There was no manual for it. So, I had to sit there are fiddle with it trying to figure out how to calculate an exposure. This is what I found (oh, and this will work for the other prisms too, except of course for the Spot function): First, lets take a look at the prism. On the righthand side of the prism is a large dial. You'll notice that there's an outermost ring which has shutter speed numbers printed on it. Then there is a silver, inner ring with aperture settings on it. And in the center is a black covering which rotates, and has a small window cutout to show the film speed setting.
|
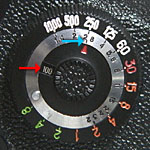 According to the type of film you're using, make sure that the correct film speed is showing through the window in the innermost ring (in the picture to the right, this is shown by the red arrow). Then, turn the second, silver ring so that the red arrow printed on the innermost ring is aligned with your lens' maximum aperture (indicated by the blue arrow in the picture). For example, if you were to use the Arsat 80mm F2.8 lens, you would align 2.8 with the red arrow. Or, if you were using the Telear-5 250mm F5.6 lens, you would align 5.6 with the red arrow. Please note that this is the lens' widest aperture, *not* the aperture you want to use to take the photograph.
|
In the next picture (below-right), the yellow arrow in the center image (for "Over exposure") points to the Spot indicator. If this little circle is on, you're in Spot mode. If it's not on, you're in center-weighted mode.
Start turning the big dial on the righthand side of the prism either way until you've got both arrows lit up. Note: Sometimes it's hard to get both arrows to light up simultaneously. If you can't get them both lit, just find the point where turning the dial a tiny bit will light up either arrow alternately. That should be your correct exposure point. Again, the meters are uncoupled and the cameras are purely mechanical - So there's no way for the meter to tell the camera what the proper exposure is, nor is there a way for the camera to automatically set its shutter speed and lens aperture. So, next take your eye away from the finder and look at the dial on the righthand side of the prism again. (By the way, it's a good idea to make sure that when you were rotating that outer ring, the inner rings didn't shift either. If they did shift, reset them to their correct positions without disturbing the outer ring.)
Similarly, by looking at the dial, you can quickly see that 1/60 second at F5.6, 1/30 second at F8 or 1/15 second at F11, etc. will also work. If the numbers don't line up exactly, you can always set the lens to a half stop setting (if possible), or just use your judgment and select an exposure that you think will work for the scene in front of you. Unfortunately, when I got my prism and tested it out, it was two whole F-stops off the exposure that my trusty Minolta spotmeter said was correct. Time to calibrate it! Read on... |
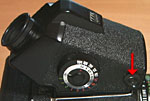 Next, turn the prism on by pushing the small black button located toward the front right side of the prism (red arrow). Pushing it once will turn it on. Pushing it thereafter will toggle it between center-weighted and spot mode. The prism will turn off automatically after a minute or so.
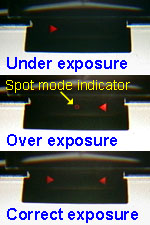 Next, look through the finder. In the readout area at the top of the frame, if you see an arrow pointing to the right, you're under the correct exposure. If you see an arrow pointing to the left, you're over the correct exposure. If both arrows are lit up, you've got a correct exposure.
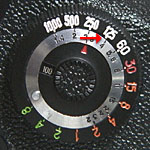 You now have a range of possible exposures that you can use. In the example to the right, you'll see that 1/125 second lines up with F4 (red arrow). All you have to do is set your lens to F4 and the camera's shutter speed to 1/125 second. (Make sure the shutter is COCKED before you try to change the shutter speed!)
|
Most of the meters for Kiev cameras seem to come from the factory completely uncalibrated. Fortunately, calibrating them is a pretty simple procedure. Here is Kevin Kalsbeek's guide for calibrating Kiev metered prisms.
The Kiev TTL prisms postdating approximately 1990 can be easily recalibrated to eliminate incorrect meter readings. This method, however, cannot correct a meter that is not linear.
Notes for Spot/TTL Prism
The metering selector switch surrounds the meter "on" switch. With the selector switch set to the white dot, the meter reads the standard 30X50mm center weighted pattern. With the selector switch set to the green dot, the (approx.) 5X9mm "spot" located near the top of the frame, is the sensitive area - it's difficult to call it a "spot". Set the selector to the white dot (30X50mm area) and set meter as described above. When the meters agree, recheck with the selector in the green "spot" position. If there is any disagreement between the Averaging and spot readings during the recheck, reset the meter so that it is correct for the mode which you will use the most. GOOD LUCK! Ver. 1.0
Last update: May 2, 2001
|